1.1.1. startActivity流程
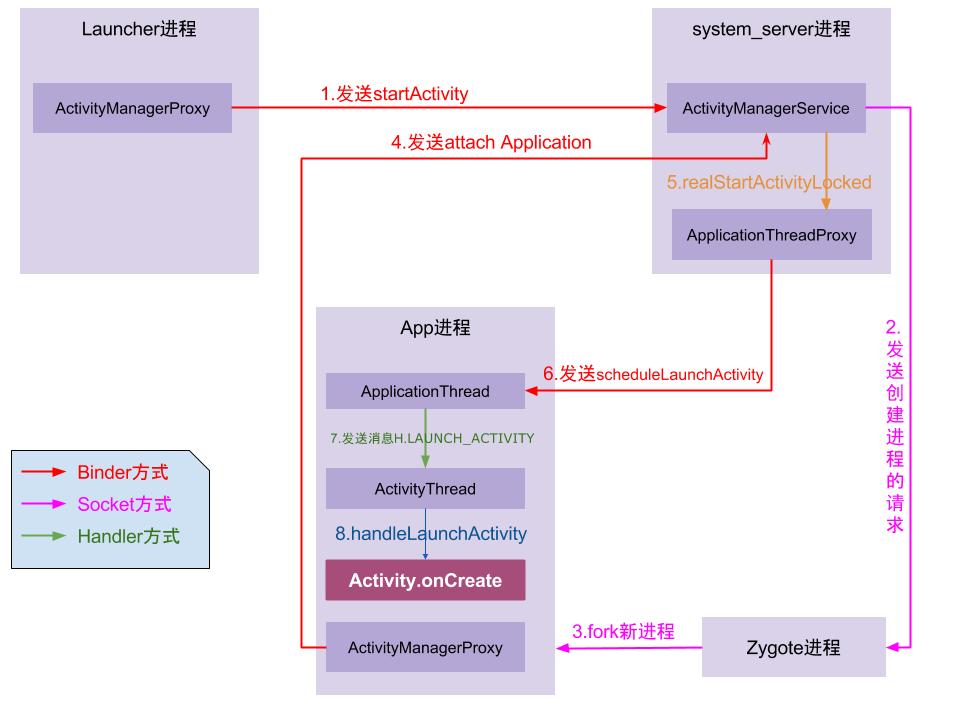
整个流程主要涉及四个进程:
- 调用者进程,如果是在桌面启动应用就是Launcher应用进程。
- SystemServer进程(AMS所在进程),该进程主要运行着系统服务组件。
- Zygote进程,该进程主要用来fork新进程。
新启动的应用进程,该进程就是用来承载应用运行的进程了,它也是应用的主线程(新创建的进程就是主线程),处理组件生命周期、界面绘制等相关事情。 有了以上的理解,整个流程可以概括如下:
点击桌面App图标,Launcher进程采用Binder IPC向system_server进程发起startActivity请求;
- ContextImpl.java - startActivity()
- Instrumentation.java - execStartActivity()
- AMS.startActivity()
- ActivityStarter.java -startActivityMayWait() 解析Intent,生成ActivityInfo和ResolveInfo -
- ActivityStarter.java -startActivityLocked() 创建将要启动的ActivityRecord
- ActivityStarter.java -startActivity() -startActivityUnchecked()
- ActivityStack.java -startActivityLocked()
- ActivityStackSupervisor.java -resumeFocusedStackTopActivityLocked() - resumeTopActivityUncheckedLocked()
- ActivityStack.java -resumeTopActivityUncheckedLocked() - resumeTopActivityInnerLocked()
- ActivityStackSupervisor.java -startSpecificActivityLocked()
AMS -startProcessLocked() -Process.start()启动进程
system_server进程接收到请求后,向zygote进程发送创建进程的请求;
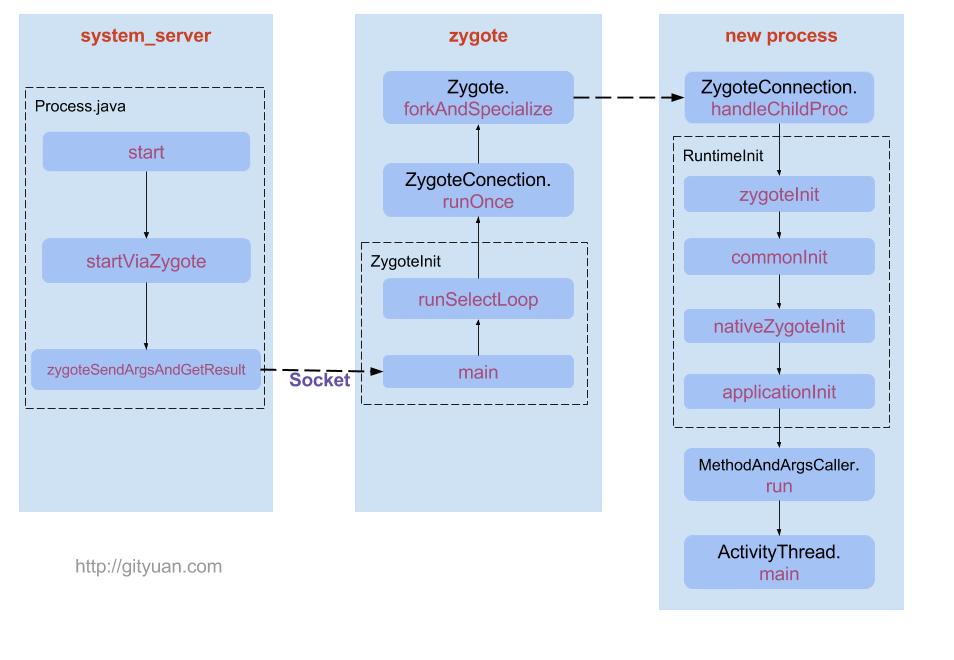
- Process.java - zygoteProcess.start()
- ZygoteProcess.java - startViaZygote()- zygoteSendArgsAndGetResult() -openZygoteSocketIfNeeded()
- zygoteSendArgsAndGetResult()方法通过socket向Zygote进程发送消息
- Zygote进程fork出新的子进程,即App进程;
- ZygoteInit.java -main()
- ZygoteServer.java -runSelectLoop() - acceptCommandPeer()
- ZygoteConnection.java - runOnce(ZygoteServer zygoteServer)
- Zygote.java -Zygote.forkAndSpecialize(); 通过一系列调用在native层fork出新的进程返回pid
- ZygoteConnection.java - handleChildProc()
- ZygoteInit.java - zygoteInit()
- RuntimeInit.java - RuntimeInit.applicationInit(targetSdkVersion, argv, classLoader); - invokeStaticMain(args.startClass, args.startArgs, classLoader) invokeStaticMain()方法中抛出的异常MethodAndArgsCaller caller,该方法的参数m是指main()方法, argv是指ActivityThread. //通过抛出异常,回到ZygoteInit.main()。这样做好处是能清空栈帧,提高栈帧利用率。
- App进程,通过Binder IPC向sytem_server进程发起attachApplication请求;
- ActivityThread.java -main() -attach(false)
AMS -attachApplication() -attachApplicationLocked()
ApplicationThreadProxy.java -bindApplication() ATP经过binder ipc传递到ATN的onTransact过程.
- ATN.onTransact()
ActivityThread.java -bindApplication() - sendMessage(H.BIND_APPLICATION, data)-handleBindApplication()
system_server进程在收到请求后,进行一系列准备工作后,再通过binder IPC向App进程发送scheduleLaunchActivity请求;
- ActivityStackSupervisor.java - realStartActivityLocked()
- App进程的binder线程(ApplicationThread)在收到请求后,通过handler向主线程发送LAUNCH_ACTIVITY消息;
ActivityThread.java - scheduleLaunchActivity() -sendMessage(H.LAUNCH_ACTIVITY, r)-handleLaunchActivity()- performLaunchActivity() - activity.onCreate()
主线程在收到Message后,通过发射机制创建目标Activity,并回调Activity.onCreate()等方法。
Android主线程
1. 主线程的启动
ActivityThread.java
public static void main(String[] args) {
    ....

        Looper.prepareMainLooper(); //1
        if (sMainThreadHandler == null) {
            sMainThreadHandler = new Handler();
        }

        ActivityThread thread = new ActivityThread();
        thread.attach(false);//2

        Looper.loop();

        throw new RuntimeException("Main thread loop unexpectedly exited");
    }
Looper.java
 public static void prepareMainLooper() {
        prepare();
        setMainLooper(myLooper());
        myLooper().mQueue.mQuitAllowed = false;
    }

    public static void prepare() {
        if (sThreadLocal.get() != null) {
            throw new RuntimeException("Only one Looper may be created per thread");
        }
        sThreadLocal.set(new Looper());
    }

  private Looper() {
    //创建消息队列
    mQueue = new MessageQueue(quitAllowed);
    //获取当前线程的引用
    mThread = Thread.currentThread();
    }
1.Looper.prepareMainLooper()
Looper.prepareMainLooper() -> Looper.prepare(false) -> new Looper(false) 该过程创建了Looper,并在new Looper中创建消息队列,将当前线程与Looper关联起来
prepare()与prepareMainLooper()区别在于传递给mQuitAllowed 的值是true还是false。当是主线成传递为false,因为主线程不允许退出。MessageQueue的quit()中有如下判断
 void quit(boolean safe) {
        if (!mQuitAllowed) {
            throw new IllegalStateException("Main thread not allowed to quit.");
        }
2.thread.attach(false)
ActivityThread.java
private void attach(boolean system) {

        mSystemThread = system;
        if (!system) {
             ...
            final IActivityManager mgr = ActivityManagerNative.getDefault();
            try {
            //ActivityManagerNative为ActivityManagerService的本地调用类
                mgr.attachApplication(mAppThread);
            } catch (RemoteException ex) {
                throw ex.rethrowFromSystemServer();
            }
            // Watch for getting close to heap limit.
ActivityManagerService.java
attachApplication(IApplicationThread thread)-> attachApplicationLocked(thread, callingPid)(该方法超级长);
rivate final boolean attachApplicationLocked(IApplicationThread thread,
            int pid) {
          ....
            thread.bindApplication(processName, appInfo, providers,
                    app.instrumentationClass, profileFile, profileFd, profileAutoStop,
                    app.instrumentationArguments, app.instrumentationWatcher, testMode,
                    isRestrictedBackupMode || !normalMode, app.persistent,
                    mConfiguration, app.compat, getCommonServicesLocked(),
                    mCoreSettingsObserver.getCoreSettingsLocked());

            .....
                    if (mMainStack.realStartActivityLocked(hr, app, true, true)) {
                        didSomething = true;
                    }

         ....
    }
attachApplicationLocked中调用了IApplicationThread的bindApplication函数,于是又回到了ActivityThread.java
ActivityThread.java
   public final void bindApplication(String processName, ApplicationInfo appInfo,
                List<ProviderInfo> providers, ComponentName instrumentationName,
                ProfilerInfo profilerInfo, Bundle instrumentationArgs,
                IInstrumentationWatcher instrumentationWatcher,
                IUiAutomationConnection instrumentationUiConnection, int debugMode,
                boolean enableBinderTracking, boolean trackAllocation,
                boolean isRestrictedBackupMode, boolean persistent, Configuration config,
                CompatibilityInfo compatInfo, Map<String, IBinder> services, Bundle coreSettings) {

            if (services != null) {
                // Setup the service cache in the ServiceManager
                ServiceManager.initServiceCache(services);
            }

           ...
            sendMessage(H.BIND_APPLICATION, data);
        }
sendMessage(H.BIND_APPLICATION, data) 即向messageQueue中发送了一个BIND_APPLICATION的消息。H类继承自Handler,经过一系列操作最终会走到H的handlemessage()中
case BIND_APPLICATION:
                    Trace.traceBegin(Trace.TRACE_TAG_ACTIVITY_MANAGER, "bindApplication");
                    AppBindData data = (AppBindData)msg.obj;
                    handleBindApplication(data);
                    Trace.traceEnd(Trace.TRACE_TAG_ACTIVITY_MANAGER);

看下handleBindApplication做了什么,这个方法仍然非常长

private void handleBindApplication(AppBindData data) {
      ......
        Application app = data.info.makeApplication(data.restrictedBackupMode, null);
        mInitialApplication = app;
      ...

        try {
            mInstrumentation.callApplicationOnCreate(app);
        } catch (Exception e) {
        ....
        }
  }
继续看AMS中的attachApplicationLocked方法,当bindApplication后
  if (normalMode) {
            try {
                if (mStackSupervisor.attachApplicationLocked(app)) {
                    didSomething = true;
                }
            } catch (Exception e) {
                Slog.wtf(TAG, "Exception thrown launching activities in " + app, e);
                badApp = true;
            }
        }
会走到ActivityStackSupervisor中attachApplicationLocked中 -> realStartActivityLocked(hr, app, true, true)
  app.thread.scheduleLaunchActivity(new Intent(r.intent), r.appToken,
                    System.identityHashCode(r), r.info, new Configuration(mService.mConfiguration),
                    new Configuration(task.mOverrideConfig), r.compat, r.launchedFromPackage,
                    task.voiceInteractor, app.repProcState, r.icicle, r.persistentState, results,
                    newIntents, !andResume, mService.isNextTransitionForward(), profilerInfo);
于是又回到了ActivityThread中的scheduleLaunchActivity() 该方法中发送了一个LAUNCH_ACTIVITY的消息
public final void scheduleLaunchActivity(...) {

            sendMessage(H.LAUNCH_ACTIVITY, r);
        }
经过一番折腾handleLaunchActivity()
 case LAUNCH_ACTIVITY: {

     handleLaunchActivity(r, null, "LAUNCH_ACTIVITY");
  }

private void handleLaunchActivity(ActivityClientRecord r, Intent customIntent) {
      ....
        Activity a = performLaunchActivity(r, customIntent);
   ....
}
performLaunchActivity函数中做了以下事情
- 获取类加载器 创建Activity对象。
- 初始化activity对象的上下文
- 为当前activity创建窗口。
- 分别调用activity的onCreate onResume等函数。
private Activity performLaunchActivity(ActivityClientRecord r, Intent customIntent) {
       .....
        Activity activity = null;
        try {

//获取类加载器,创建activity对象
            java.lang.ClassLoader cl = r.packageInfo.getClassLoader();
            activity = mInstrumentation.newActivity(
                    cl, component.getClassName(), r.intent);
          ....
        } catch (Exception e) {
           ....
        }
        try {
        //获取当前Application对象,因为前面已经创建过了,所以这里直接返回
            Application app = r.packageInfo.makeApplication(false, mInstrumentation);
        ...
            if (activity != null) {
                ContextImpl appContext = new ContextImpl();
                appContext.init(r.packageInfo, r.token, this);
                appContext.setOuterContext(activity);
                CharSequence title = r.activityInfo.loadLabel(appContext.getPackageManager());
                Configuration config = new Configuration(mCompatConfiguration);
             ...
             //创建窗口
                activity.attach(appContext, this, getInstrumentation(), r.token,
                        r.ident, app, r.intent, r.activityInfo, title, r.parent,
                        r.embeddedID, r.lastNonConfigurationInstances, config);
               ...
                activity.mCalled = false;
                mInstrumentation.callActivityOnCreate(activity, r.state);
              ...
                r.activity = activity;
                r.stopped = true;
                if (!r.activity.mFinished) {
                    activity.performStart();
                    r.stopped = false;
                }
                if (!r.activity.mFinished) {
                    if (r.state != null) {
                        mInstrumentation.callActivityOnRestoreInstanceState(activity, r.state);
                    }
                }
                if (!r.activity.mFinished) {
                    activity.mCalled = false;
                    mInstrumentation.callActivityOnPostCreate(activity, r.state);
                ...
                }
            }
            r.paused = true;
            mActivities.put(r.token, r);
        } catch (SuperNotCalledException e) {
            throw e;
        } catch (Exception e) {
            if (!mInstrumentation.onException(activity, e)) {
                throw new RuntimeException(
                    "Unable to start activity " + component
                    + ": " + e.toString(), e);
            }
        }
        return activity;
}
调用oncreate
mInstrumentation.callActivityOnCreate()
activity.performCreate(icicle);
onCreate(icicle);
总结
主进程从ActivityThread的main函数开始
- 通过Looper.prepareMainLooper();分别创建了一个Looper对象和MessageQueue对象
- thread.attach(false);在AMS的attachApplicationLocked()方法中,会通过bindApplication()先发送一个what为H.BIND_APPLICATION的msg ,创建Application对象
- bindApplication后会继续发送一个what为H.LAUNCH_ACTIVITY的msg,收到消息后创建Activity对象及相关信息,创建窗口,并调用对应Activity的生命周期方法。
1.ActivityStarter:startActivityMayWait
方法主要是解析Intent,生成ActivityInfo和ResolveInfo

2.ActivityStarter:startActivityLocked
在这里面创建将要启动的ActivityRecord

3.ActivityStarter:startActivityUnchecked
里面调用setInitialState,把mStartActivity设置给我们将要启动的;
mReusedActivity = getReusableIntentActivity();在获取当前依附启动Activity;
setTaskFromReuseOrCreateNewTask或setTaskFromSourceRecord等方法创建新的或者找到移动Task;
调用mTargetStack.startActivityLocked(mStartActivity, newTask, mKeepCurTransition, mOptions);
就是ActivityStack:startActivityLocked方法,这里面会调用task.addActivityToTop(r),把将要启动的Activity放到他对应的Task的最上面;
if (!mLaunchTaskBehind) {

    mService.setFocusedActivityLocked(mStartActivity,
                               "startedActivity");

}判断启动需要,把将要启动的设置成系统,也就是AMS的焦点FocusedActivity;
然后调用mSupervisor.resumeFocusedStackTopActivityLocked(

就是ActivityStack:resumeTopActivityInnerLocked
方法,来进行正常启动;
4.ActivityStack:resumeTopActivityInnerLocked
在方法里面会调用pause相关方法,就是跳转Activity的onPause方法
boolean pausing = mStackSupervisor.pauseBackStacks(...);

if (mResumedActivity != null) {

    pausing |= startPausingLocked(...);

}
然后会return,不在继续执行resumeTopActivityInnerLocked方法;
5. 在执行上一个Activity的onPause方法
ActivityManagerService.activityPaused---》ActivityStack.activityPausedLocked---》ActivityStack.completePauseLocked---》
ActivityStack.resumeTopActivityInnerLocked
通过执行完Pause的过程,最后在进入到启动的resumeTopActivityInnerLocked方法,在这个时候,会继续往下走;
如果已经创建Activity,就直接调用next.app.thread.scheduleResumeActivity(
然后调用Activity的onResume;
没有对应的进程app.thread,就调用startSpecificActivityLocked
ActivityStackSupervisor:startSpecificActivityLocked;
在startSpecificActivityLocked里面,启动Activity的进程已经存在,就是调用ActivityStackSupervisor:realStartActivityLocked,在scheduleLaunchActivity正式创建onCreate对应Activity;
如果进程不存在就是调用AMS.startProcessLocked启动对应的新的进程ActivityThread,在启动对应的Activity,在ActivityThread启动以后对应的public static void main(String[] args) {--》
调用ActivityManagerService.attachApplication方法--》
ActivityManagerService.attachApplicationLocked--》
ActivityStackSupervisor.attachApplicationLocked--》
最后在调用到ActivityStackSupervisor.realStartActivityLocked